
A Figma-inspired video editor is one where the canvas is the place you work, the document is the truth, the browser is the runtime, and the free tier is the whole tool rather than a trial. AtomCut is that, with one addition Figma never made: a real multi-track timeline under the canvas, so a frame has a duration, a group is a clip, and every property you can see can be keyframed. It is free, needs no account, runs offline, and exports MP4, WebM, GIF, PNG sequences, SVG and Lottie. I built it alone over the last few months, and this post is about which Figma ideas survived contact with a time axis, which had to change, and what "done right" has cost so far.
AtomCut is a free motion design and video editor that runs in the browser, at app.atomcut.net. I am not affiliated with Figma; it is the reference point because it is the one most designers and developers already have in their hands.
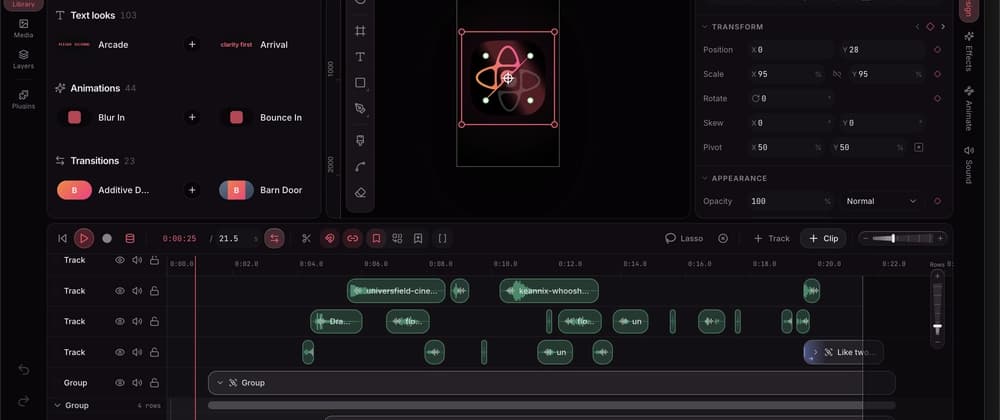
Canvas above, timeline below, one document underneath both. The rocket is a group; the group is a clip; its four paths are its rows.
Figma's real invention was not the pen tool. It was a set of decisions about where work lives: on an infinite canvas with artboards, in one document, edited by direct manipulation, in a browser tab you can send to anyone. Everything below is one of those decisions, what it became in AtomCut, and the thing time does to it.
| In Figma | In AtomCut | What time adds | |---|---|---| | Frames (artboards) on an infinite canvas | Frames on an infinite canvas, F | a frame carries a duration and its own frame rate; nest one inside another and it becomes a clip with speed, loop, ping-pong and reverse | | Pages | Pages, plus auto-managed Nested and Components pages | pre-comps and component sources live on their own pages, so the page you design on stays clean | | Components and instances | Components: a frame flagged as a shared source; an instance is a nested clip pointing at it | ⌥-drag, paste and duplicate make new instances; editing the source updates all of them at the current time; detaching deep-clones on purpose | | Variables | Five typed variables: color, number, fontFamily, fontWeight, string; bind any field | a variable shares one value across layers; a keyframe animates one value over time; they are different axes and both work on the same field | | Auto layout | Select what you already arranged, press ⇧A; the row, column or grid you made becomes the rule, gap included | gap, padding and alignment are keyframeable, so a layout can widen over time like a shape changes colour | | Fills and strokes as paint lists | Paint lists, solid and gradient, dashes, caps, joins | every stop keyframes; a stroke can be trimmed along its length over time | | Boolean operations | Composite groups: union, subtract, intersect, mask, as a mode on the group you already have | the group is also a clip, so the boolean result can be trimmed, faded and moved as one thing | | Crop-mode image fill | A cropped layer has two transforms: the window and the picture inside it | you can pan the footage inside a nailed-down frame, and the two never fight between keyframes | | Plugins | Sandboxed plugins with a typed API; install from a .zip under Plugins → Manage plugins… | the built-in Icons, Waveform Visualizer and LipSync Studio are plugins, and they insert ordinary clips | | Multiplayer | Not yet | this is the gap; more below |
The pattern in the right column is the whole design. Nothing in the timeline is a special case bolted onto the canvas; every canvas idea kept its shape and gained a time dimension.
Every browser tool for motion I have used picks a side. Canvas-first tools (Jitter, Fable, Figma's own prototype transitions) have a stage you can draw on and a thin timeline. Video-first tools (CapCut, Clipchamp, Canva's video mode) have a timeline and no pen, no boolean ops, no keyframes on arbitrary properties. Both are good at what they chose. Neither lets you draw a lower third with a pen tool and then ripple-trim it against a talking-head clip in the same window.
AtomCut's one structural bet is that the two halves belong together: canvas above, an NLE below. The timeline is a proper one, not a keyframe strip. Tracks are unified channels, so any clip rides any lane. Drag a clip into its neighbour to ripple or overwrite. Grab the seam between two clips to roll the edit. Link clips so they trim and delete together, the DaVinci way. Split with the razor and the split is keyframe-aware, so the curve is continuous across the cut. Audio shows real decoded waveforms and carries its own effect stack.
None of that is new to video editors. What is new is what sits above it: the same frame that plays in the timeline is an artboard you can pen-edit, auto-layout and turn into a component.
The place where "Figma idea meets timeline" is most visible is grouping. In Figma a group is a folder in the layers panel. In a video editor a group is usually a pre-comp: a separate composition you drill into, with its own timeline you cannot see next to the parent's.
In AtomCut a group is a clip, exactly like any other, that happens to hold rows of its own. It sits on an ordinary lane of its parent, at any z. Open it and its rows appear nested under its bar, in the same timeline, at the same zoom. Because it is a clip it carries what every clip carries: transform, paint, effects, opacity, blend mode, feather, an in and an out animation, on top of whatever its members carry.
Its span is a window, not a container that owns its children's time. Trim the group's edge and members past the edge are hidden, never retimed; trim it back out and they reappear where they were. Drop any clip onto a group and it joins. Drag a member past the group's edge and it lifts out onto its own row. A clip is in a group because it sits on one of that group's rows; there is no clip.groupId field anywhere, so moving a clip onto a row is moving it into the group, and nothing ever needs compacting.
This is also what an icon becomes. Drop a Lucide rocket from the built-in icon search and it lands as a group of four path layers. Turn on Draw On and the outline inks itself in over 900 ms, one path after another, in the order it was drawn. The group is the clip you trim; the paths are the rows you keyframe.
The document is the product. Everything a project is (frames, layers, paints, effects, keyframes, sounds, captions, variables, node graphs, motion tracks) lives in one zod-validated JSON document, AtomCutDocument, currently at schema version 75. Every migration up to it still runs on load, so a file saved by an older build still opens. Nothing editor-specific leaks into the document; the web editor renders it, and a future native plugin could rebuild it from the same file.
The core is pure. @atomcut/core has no DOM and no React. Evaluation is a deterministic function, (document, time) → frame, and it is the same code path for playback, scrubbing, the MP4 and WebM encoders, the PNG sequence and the Lottie translator. If the export ever differs from what you saw while scrubbing, that is a bug with one place to look, not a second renderer to reconcile.
Undo is patches, not snapshots. Every mutation goes through one store using immer's produceWithPatches. A history entry stores forward and inverse patches; a continuous gesture coalesces into one entry through a merge key. Undo cost is proportional to the change, not to the document.
A frame rate is a grid, never a time. Every frame carries its own fps and there is no document-global rate, because a global rate plus a per-frame override is two stored fields for one fact, and the halves of the app that read each one disagreed the moment a comp set its own. A rate only quantizes: it is what the ruler ticks on, what ← and → step by, what snapping magnetises to, what the exporter iterates. So nesting composes for free. A 12 fps flipbook inside a 60 fps comp holds each drawing for 83.33 ms regardless; the parent samples every 16.67 ms and sees the same cell five times. Nothing resamples across a comp boundary, so nothing drifts.
One fact, one field. A mirrored layer is a negative scale and nothing else; there is no flipX flag, because a flag plus a sign disagree the moment a keyframe interpolates between them. The pivot is stored as a fraction of the layer's own box, like CSS transform-origin, so it survives a resize, a re-wrap and a media swap. Each of these replaced a family of bugs, not one bug.